About the Old Girl

She was born in the summer of '69 in Ontario, Canada; titled in '70 in Maine, USA. She shares some traits of both a '69 and a '70.

My uncle is the first owner; after 35 years of pining for it I talked him out of it.

She is mostly stock; what little add-ons are mainly because I haven't found a true stock replacement. These are all interim solutions until she gets a true frame off restoration. Of course I'll document that all here. She's had a face-lift about 2004-05; lots of rust was removed and a big portion of the body replaced. Maine winters can be pretty harsh on steel.

Key bits of info:
- Engine - Buick V-6 225 cubic inch
- Transmission - Dana T-14, 3 speed
- Transfer Case - Spicer T-18
- Front Differential - Dana 27, 3.73 ratio
- Rear Differential - Dana 44, 3.73 ratio
- Wheels - 15 inch
- Winch - front mounted Ramsey MX-2000 PTO (dealer installed)
- Top - Meyer Steel top (dealer installed)
- Color - Omaha Orange

This blog is a record of what we do together and of course what I do to her to keep her in good shape...

Monday, October 26, 2015

Her rear end just doesn't feel right


Two things are important in the near term:
1) that rear cross member is rusted out and falling apart; needs to be replaced;
2) there is nothing between the front bumper of the jerk following too close behind me, and my rear lights.

So after spending a couple of days grinding rivets off the frame-to-cross member and cutting a couple of bolts (okay, 8 bolts!) the draw bar and cross member came off.  Above is the original.


The new one is just a C-channel steel with some holes and other cut outs drilled, and a little bit of bending and shaping.  turns out a guy in North Carolina makes a perfect replica for a very reasonable price ($100).


But for added protection (?) I decided to add a bumper to the rear end that would extend out beyond the tail lights and provide a modicum of protection.  I looked around and decided brushed steel tube looked best.  Of course, that was of the choices I had that would fit.


I'm not 100% happy with the look as it's not stock nor is it appropriate.  If I can find a similar bumper for the front, to balance the look, I'll stick with it.

Thanks for looking...


Thursday, October 22, 2015

Something to hang on to...


There are two holes in the dash...okay there a lot of holes in the dash but two just stand right out because there is NOTHING in those two holes.

The CJ line has a grab  bar right in the middle of the dash, just offset to the passenger side.  Obviously for someone to hang on to when the road gets rough and considering that handles anywhere else were not very practicable (no roll bars remember) so having one on the dash sort of makes sense.

Problem is, there is NOT a grab bar on the Old Girl!  Two nice holes, in just the right place.  But what happened to that bar?

The answer is lost to time, but it turns out these are easy to get and I actually had a choice of 3 finishes:
1) Chrome;
2) Black (matte);
3) Primed and ready for the paint color of my choosing.

I chose Chrome:

Isn't that nice?

Thanks for looking...


Tuesday, October 20, 2015

That sexy look over her shoulder...


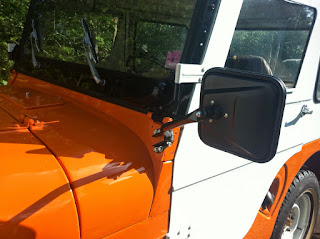
Mirrors.  And other details of course.  But let's talk mirrors.

Originally the CJ family had a simple post sticking out the driver's side with a small round mirror on it.  Then in about 1965 somebody at Kaiser decided to listen to safety advisers (aka the gov'MENT) and increase the size of the mirror.  They chose a rectangular job.


In the above photo you can just see it.  That's a photo from the 1969 assembly line in Toledo, Ohio.  Likely taken just before Kaiser SOLD OUT to AMC, but hey that's not my bag, baby.  But this photo plays a few roles in some other things I'm doing to make her like her original self.

Later in the '70's, I believe about '74, the rectangular mirror was replaced by two square mirrors, one on each side.  Enough on the history you say, what about the Old Girl?

Getting a perfect replacement for that style of mirror is pretty difficult, unless I can find someone willing to part with theirs...unlikely since the few that exist, exist because the owner wants to keep their Jeep original.  Otherwise most of those mirrors went to the same place the Old Girl's went: caught on some branch while on the trail, and subsequently the remnants were removed and sent to the local landfill.

So, I browsed the internet with my...browser, and found a pair of replacement mirrors.  I decided the price was right and got a pair, one for each side.  I doubt I'll ever install the one on the right simply because it would require tapping 4 holes, et cetera; and for accuracy she wasn't born with 2 mirrors so why bother?


So I've got this beauty mounted.  Of course after all the adjusting and getting it just right...can't see much out of it because of vibration.  Just a blurry mess.  Oh well, at least she looks good!


Thanks for looking...

Monday, October 19, 2015

Can I get the door (handle), Madame?


Okay, this is a bit of character.  The Old Girl saw some action in her younger days; some bits got ripped off by branches and other things while running through the Maine woods.

Like her mirrors...the spare tire holder...the side steps...and the left door handle.  But no need to fret; it's a simple door mechanism so any door handle works:

I believe that's available from the local hardware store, typically seen on some older homes.  The handle is glass with a square steel post and certainly goes all the way through.  Hey, it works!


So I decided to go cheap and got some nice handles to replace the existing ones; the passenger side still works but is corroded; I'll replace that one when I do some restoration work on the doors and top.


Much better and now it looks natural, new, almost like it was supposed to be there.  Of course, I still cannot lock the Girl, but why should I?  It's not like I keep anything of value inside her.  The "value" is really the Girl herself.  Any anyone with a modicum of hotwire knowledge can take her.

But then again down here in Southern Maryland she's the only one of her kind...so if someone takes her they need to break her up quick, which means she won't be worth much.  So I'm not too worried and besides, she doesn't get out of my sight much.

Thanks for looking...


Sunday, October 18, 2015

Something better to cushion my rump

11 September, 2012

The original seats in the girl are done for.  I'm keeping the frames as I want to have them restored, and the photos show the original colors.  I believe they are Trim Package # 338 - Buckskin, but as is other things "not quite right" with the girl this isn't the right trim for the color (Omaha Orange).  For that matter, technically in 1969 or 1970 none of the production CJ-5s were painted in Omaha Orange, according to published options and records.  I suspect most of those "factory options" were for the Toledo factory, not the Ontario factory where the Old Girl was made.    

When I do the restoration I'll go for a material that is similar to the two colors here.  Not sure what I'd call those colors, but a brown and an orange-tan sound about right.


I went on line and searched for new seats.  My choices are not many.  I decided to go with Rugged Ridge front seats.  The color I got was "spice" as it looked closest to the original seat color.  The tan ones were too light.  The seats are for the intermediate CJ5, made from 1973-1980.  Other than how they are mounted, the tub should be the same...

After discussing how to mount the new seat in online forums I had resigned myself to basically having someone local fabricate (as in weld) a new mounting bracket for the passenger side.  The driver's side fit perfect as is.  Eventually someone who'd bought the same seats showed me the mount he made from steel angle stock, using just bolts.  His solution wouldn't work for me, because his seat mounted to brackets on the tool box whereas mine mounts to a bracket on the tub with different measurements, because I don't have a tool box.  Why Kaiser could not have used the same pattern on both seats is beyond me, as it would easily have fit and made it more common.  At any rate, looking at his method gave me inspiration and I was able to use 1/8th inch steel plate, 3 inches wide and 15 inches long to basically mount the existing bracket to the seat.  All with bolts so nothing was damaged.  I went ahead and sanded the rust off the old brackets and repainted them.  Real sharp.


I'm not sure I like the high backs.  I got them for the back support, although it ain't much; but they don't look stock.  I may regret this in the future, but for right now they work and it means I can drive her!

Thanks for looking...